Showing posts with label Cold Process Soap. Show all posts

Friday, August 1, 2014

Tallow Beer Soap with Colloidal Oatmeal & Jojoba Beads

I saw this on pinteret some time ago and it was my inspiration.  However I didn't have wheat bran.  Is that the same thing as wheat germ?   Well I didn't have wheat germ either as I had thought but I must have tossed it when cleaning out the fridge one day.   Well I found that out after I had opened the beer and set it to boil to make some beer soap.  So I improvised........
http://www.greatcakessoapworks.com/handmade-soap-blog/index.php/how-to-make-beer-soap/


When working with beer, there are some very important things to know and remember.  First is that you need to cook the alcohol out or else your soap will seize.

The second thing is you can use beer as the only liquid in your soap or part of the liquid.   If you use it as the only liquid you will need to take some safety measures first.  Beer tends to volcano up out of the container used so I suggest you use a much larger container than you normally use to mix your lye solution in.  You must also make sure it's heat proof and can withstand the high temperature that takes place when the lye reacts with the beer.   Use a 2 quart pitcher or a gallon one depending on the size of your batch.  (you know the kind you make kool-aid in... rubbermaid etc)   Put the pitcher in your kitchen sink or another bowl just in case it does volcano over.  That way you don't end up with a mess you would rather not have to clean up.   Pour the lye into your beer very, very, very slowly.  I can't stress this enough.  It will smell terrible so I usually hold my breath while I stir sprinkling the lye in every so slowly.    Let it cool down and come down to room temperature before using.

But for this recipe I use water with my lye that I pre-mixed some time ago.   This way I don't have to wait for my lye solution to cool and using a little math I know how much additional liquid to add.   Using equal parts water and lye I pour that into a small pitcher and set it aside until I am ready for it.

Always use a lye calculator to figure out how much lye and total liquid for your recipe.

This particular batch that I made I used 400 grams of oils.
I used 26% Lye Solution but you can change that to your own preference.  I just personally like the additional liquids in my soap.
7% Superfat (lye discount)

The benchmarks came up on soapcalc as this.   This is a bit different than my normal soap as the cleansing number is higher than what I normally make for bath soap.  But I am using this in a soap scented with a mens fragrance and I wanted those extra cleansing points.
Hardness 40
Cleansing 21
Conditioning 55
Bubbly Lather 35
Creamy Lather 33

20% Tallow
15% Coconut Oil
15% Palm Kernel Oil
15% Castor Oil
13% Sunflower Oil
12% Avocado Oil
10% Olive Oil

Remember oils are not interchangeable for the most part but you can change a few.
* ~ If you don't have tallow you can use palm.  I would not suggest lard as it's just not has hard as the others, but that is my own personal preference.
** ~ If you have only have palm kernel oil or coconut oil you can use 30% of one or the other instead of both.
*** ~ The 15% of castor oil is critical as it boosts the lather, but also it is the balance of the whole recipe.  It doesn't make the soap sticky as some report if the recipe is balanced in the first place.
**** ~ The last three oils that total 35%.  Sunflower, avocado and olive oil but you can can sub whatever oils you happen to have or want to use.  But I would watch close on how much soybean (vegetable) oil and canola oil you use keeping them low percents to 8% or less of each one if you are wanting to use either of these.  The reason is because these oils are prone to DOS (dreaded orange spots) in soap and can go rancid in your soap after the soap is made.   But if you want to use a butter such a shea, cocoa or mango butter I would suggest between 5% and 10%.   But just so the total equal to 35% total.

Please run your recipe through your favorite lye calculator to get the amount of lye and liquid for the batch you are making.
http://www.soapcalc.net/calc/SoapCalcWP.asp
If you are going to tweak this recipe and use different oils from that I have given to use you can adjust the percents up and down until they are the same as what I have given or what you like.   Personally unless the soap contains a very high percent of olive oil (70% or more) I would not go lower than 40 for the hardness.  Otherwise it's like a kids teeter totter, one number goes up the same time the other number goes down.  So it's a matter of finding the balance of the entire recipe and knowing what benchmarks to look for.

I add all my "additives" as a % PPO.  This means Per Pound of Oil.  This makes is much easier to figure out how much should be used and you can make a small test batch and it's going to be the exact same recipe if you want to make it again but a larger batch.   To figure out how much to use PPO is quite simple.  For example this batch uses 400 grams of oils.   The recommended use of fragrance is 1 oz per pound of oils.  But this can be difficult to figure out if you are using an uneven number or you are figuring your recipe in grams.  So 6% PPO is roughly the same as 1 oz PPO but much easier to figure out.  Multiply 400 grams by 6% = 24 grams of fragrance!  How simple is that!

So for this recipe I used the following additives.
6% PPO ~ Fragrance
6% PPO ~ Vanilla Stabilizer (optional if the FO discolors)  I did not use this in this particular batch
3% PPO Sugar
1% PPO Salt
1.5% PPO Kaolin Clay or Talc (adds slickness to the soap)
.5% PPO Titanium Dioxide
3% PPO Sodium Lactate (liquid) mixed with my lye solution.
Raw Silk Fibers (dissolved in the lye solution)

The sugar is added as a lather booster, while the salt adds hardness.  Because I want to make sure these two dissolve I do add just a little bit of hot water to them.  You can heat water or use hot tap water.  We have a "water boiler" on the counter so I always have hot water ready at a moments notice for a cuppa cocoa or tea.  Or coffee as my hubby prefers his coffee made with a french press.

Kaolin clay or talc adds a silky feel to the soap.   I tend to add titanium dioxide to most of my soap recipes just to help lighten them up as some oils can make the soap look a bit more yellow.   Beer will also affect the color of the soap, but don't expect any beer scent to pull through to the finished bar of soap because it won't.


Now to figure out how much additional liquid that you need.  THESE NUMBERS I AM PULLING OUT OF THIN AIR AND DO NOT REPRESENT ANY AMOUNT THAT SHOULD BE ADDED INTO YOUR SOAP.  IT's JUST TO USE AS AN EXAMPLE.......

Say your recipe calls for 234 grams of a liquid
and you need 76 grams of lye

I use 76 grams of water mixed with 76 grams of sodium hydroxide (lye) set aside to cool.  If you are using master batched 50/50 lye solution you will want to use 152 grams.
Pre-measure both your water and the lye in their own individual contains before mixing together.
ALWAYS mix the lye into the water and not the other way around.  This is critical!

Now you need to do some simple math to figure out how much additional liquid is needed.  Or in the case of this soap, beer that has been boiled to remove the alcohol and cooled.
234 grams - the 76 grams already added with your lye to = 158 grams of additional liquid.


Because I wanted to go for the look of the soap in the photo in the link at the top and I didn't have any wheat germ, I added colloidal oatmeal instead.  This is ground oatmeal that has the consistency of flour. If you make your own use old fashioned oatmeal rather than instant oatmeal or baby oatmeal.  I know a lot of people use baby oatmeal but the problem with baby oatmeal or baby cereal is that it is highly processed and has a lot of the stuff you want removed and other thing added.

I used 3.5% PPO Colloidal Oatmeal
But after stirring that in I didn't think it would have the look of the soap in the picture in the link above, so I thought hard about what else I had that I could add into it and this is what I came up with.

Jojoba beads..... I have many colors to select from so I added 1.5% PPO of Black Jojoba Beads.
Jojoba beads are made from jojoba oil and is a natural product and not the same as the plastic beads that are being banned and outlawed in some states. They are very small, smaller than a grain of sand.

I added them in with the oils and I should have added them in at trace instead.  I haven't use them in soap before so it will be a new experience.  I think they may have melted just a tad because of the heat it generate when the lye solution is added.  But the effect I wanted with just a bit of color and I think it did provide that.

I did not gel this soap so the color stayed opaque and is fairly light colored even though it contains a generous amount of beer.

Soap Still In The Mold


I Will Update When I Pull The Soap Out Of The Mold


Well several hours after this soap was made, I did find that jar of wheat germ.  It was new, unopened in the cabinet!  *duh*   Oh well next batch I guess.


Sunday, July 6, 2014

How To Line (wooden or otherwise) Soap Molds With Freezer Paper PERFECTLY

I wrote this such a LONG time ago.  It was so long ago it was before I had even invested in wooden soap molds or silicone or even plastic ones for that matter.   But the process is still the same so I have decided not to redo the tutorial.

It even shows that us experienced folks were once beginners as well.


Because my method of making a soap mold liner is a little unusual I thought I would share it with ya'll. But it's also dead on accurate and works beautifully and perfectly. Without any creases or lines on the sides that you can get with guessing the lines on the freezer paper or using plastic.

With little investment in materials.
It doesn't matter if your mold is a plastic drawer organizer, or a cardboard box or a more expensive wooden mold. Perhaps you want to line something else as your mold. It's the general technique that is important.

To start with my mold is a super spendy one as you can see by my pictures. Something I am sure anyone reading this would have access to..... Even if it's not a recycled priority box, but you could use a milk carton, cereal box... anything you wanted to square or rectangle.


Ok I took a priority mail box that was 3" wide and 12" long and I cut it to be 3" high. And I got two molds from one box as well. How's that for being thrifty.


Then moving on to your investment. I am also a quilter and so I happen to have quilting tools on hand as well. So I took my quilting ruler that measures 6 1/2 inches wide and 24 inches long.


Here is a close up of the corner so you can see how it's marked.


This particular ruler cost just a hair under $10 but they do make smaller ones that are cheaper. I got mine in the craft department at wal-mart. My kids stepped on my other one, but that only measured about 13 inches long, and so i had it taped together. So I replaced it.  This was purchased some time ago so I am not sure what the current prices are.....


Now moving on to your freezer paper. You will want to draw an extra line to square up your raw edge. So use your lines on your ruler to do the work for you on this one and draw the first line to square up your corners.  This keeps the side of the paper square and even.


Next is trial and error for the most part. It may take you a few tries to get the exact measurments you need for your mold. But once you know this will make future liners easier to make. So measure your mold in length and width. And follow the directions to make a box as I show you. Slip it down into your mold. And make the next box larger or smaller based on how it fits.

For example I know that with my mold the width needs to be 1 marker smaller than 3" and the length needs to be 1 marker larger than 12". And for the hight of the sides to make it easier I also use the same width mark.


And draw your lines. Don't forget to include a mark for your corner fold marks. And fold on all the lines.


Now fold and tape your corners. Fold them to the outside, and I like to fold and tape them to the longest side.


Repeat on all 4 sides to get your box.


Now drop it down into your mold and you should have a perfect fit. Because this is paper I like to add a bit of tape to keep the paper stuck to the mold side so it doesn't fold in when i'm pouring in my soap.   I mostly use silicone molds now, but should I go back and use some of my wooden molds I think I am going to buy a roll of 1" wide grosgrain ribbon and cut two lengths, possibly three.  Put them under the paper and draping outside the mold.  I would still add a bit of tape to the corners so it doesn't fall in by accident when you are pouring....  Then when the soap has hardened you can grab the ends of the ribbon and pull the log of soap out more easily.  The ribbon is very cheap at walmart and I'm sure just as cheap at other craft stores.  I live in a small rural community and don't have access to other craft stores without ordering online or driving great distances.  (about 6 hours round trip)  So that is why I shop walmart, it's all I have......


And vola` one perfectly sized paper soap mold liner. Because cardboard tends to bow out when you add your soap I figured a way to help with this problem. If you go to the top of this tutorial and look at the first picture you will see a piece of clear tape across the center. This helps the box keep it's shape while the soap hardens.

Then when you want to remove the soap from the box just use a knife and slit through all the tape and set the box aside for the next time you want to soap. Rip the paper off your soap and you got one fantastic soap log.

And now write down the measurements you used for your soap liner so the next time you want to make soap it goes licky split to make up your liner.

Thursday, December 27, 2012

Great CP Soap For Dry Winter Skin !!! Uses Tallow and Lanolin

If you suffer from dry skin in the winter time then you might want to consider using a soap with lanolin in it.  Lanolin is technically a wax and makes it more moisturizing to the skin when used in soap or a leave on skin care product such as a lotion or a cream.


Use SoapCalc to enter your recipe to make the batch size that you need for your mold.

Superfat this recipe between 7% and 9% for extra moisturizing benefits.   This allows more oils to not saponify or change into soap when you mix in your lye solution.   For this recipe shown I superfatted at 9% to make the most of it.

30% Tallow (beef)
10% Coconut Oil
12% Palm Kernel Oil
16% Castor Oil
05% Lanolin
07% Avocado Oil
10% Shea Butter
10% Olive Oil

Keep in mind that each oil is different and brings a very specific property to the finished bar of soap. 

On SoapCalc the benchmarks for this recipe are.....
Hardness 42
Cleansing 17 
Conditioning 49
Bubbly Lather 31
Creamy Lather 40

Use the liquids of your personal preference.  While water can be used why not get a little more creative and try using a milk.  Either a powdered milk or a dairy or non-dairy milk found in the dairy section of your favorite grocery store.

Other additives can be used that you prefer.   I also added a whole egg into my recipe as one of my additives. 

If you have not made cold process soap before I recommend that you learn the process first.   You can join a forum such as my fourm the link is at the top right side of the page to learn more about how to make cold process soap and ask questions. 


In the first step I put all my solid oils and liquid oils into my soaping bowl.  I prefer to use plastic bowls when I soap and this one happens to be from a dollar store.  So it doesn't need to be fancy.   I also like plastic because I also melt my oils in the microwave.  I don't heat soaping oils until they are very hot, just hot enough to melt the solid oils.

Not shown but I prefer to use a 50/50 lye solution so I don't need to wait for cool down time.  But I pour that into a small plastic measuring cup to be used later.   If you are making up your lye solution, now would be the time to get that mixed up so it can set aside to cool down.  Raw silk fibers were also dissolved into my lye solution when it was made up.  


In another measuring cup, this one happens to be a plastic 4 cup measuring cup that is also from the dollar store.   Inside this cup I have my additional water that is needed that wasn't mixed in with my lye.  Also mixed inside this mixture is my powdered coconut milk used at the rate of 4.5 grams per ounce of water.  sodium lactate, sugar, sea salt, talt and a whole raw egg.  It's a bit clumpy but I don't worry about that at this point.


  In my bowl of melted oils I dump the coconut milk/egg contents from the above measuring cup.  I also added my fragrance oil and a little titanium dioxide at this point and used the stick blender to stick blend it into a creamy mixture.  Now with the additional liquid it makes it easier to stick blend it and get any clumps out.


Also not shown but I poured a little glycerin into the bottom of a 2 oz white solo plastic cup along with a little bit of the powdered colorant that I chose to use.  I used three colorants, each having their own cups.   From Brambleberry I used Electric Bubblegum, Fizzy Lemonade and Aqua Pearl Mica.  Using a spoon I mixed the colorant into the glycerin.  I used about 1 teaspoon per color of glycerin so it wasn't much, but just enough to get the job done.

I'm also not showing the rest of the steps because I was working and it makes it a little hard to take your own pictures.

If you haven't already put on your goggles and gloves this is the time to do that!  I usually don't put them on until I'm ready to mix the lye solution into the prepared oil mixture. 

Because I don't want this to move to fast, and I wanted the fluid consistency of my batter I put my stickblender aside. Instead I pulled out my old fashioned whisks.

I whisked it together until it was mixed well then I poured some of the batter into two other measuring cups.  I didn't measure how much was added but just eyeballed it instead.   I spooned each colorant into a different bowl and mixed the colorant into the soap batter.

When it was fully incorporated I began to use a regular soup spoon and poured a spoonfull of batter into each mold compartment.  For this batch I only used 300 grams of oil and I know that amount will fill four compartments of the yellow WSP 3" round silicone mold.   So I poured a spoonful of each color in and kept rotating colors until the colors were all used up.  Because the batter is very fluid it pours into itself creating it's own swirl.  I dripped the batter off the spoon tip in going slowly in a circular patter so it didn't all go in once spot.  I hope that makes sense.

Then once I was done, I used a small spatula and scrape out the very last of the batter into my bowls.   Then I used the tip of a spoon to very so carefully just swirl the top of the soap to give it an elegant look.

And this is what the soap looks like just after it was poured into the mold.  Because I want to keep the light colors and milk was used I am avoiding the gelling process and the mold was popped into the fridge immediately after this photo was taken. 


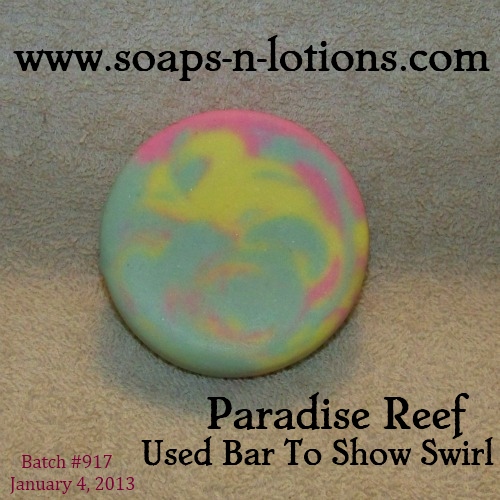
Paradise Reef was the scent used for this soap.  It behaved very nicely without any troubles.
http://www.naturesgardencandles.com/candlemaking-soap-supplies/item/df-0222/-Paradise-Reef-Fragrance-Oil-.html


Scent Description
Let's get away and go deep-sea diving at Paradise Reef. A popular vacation get away place. Paradise Reef is a sparkling fragrance with salt water and fresh air notes. This fragrance begins with notes of nectarine, bird of paradise, and water lily, followed by middle notes of passion flower, orchid, and hyacinth. A well-rounded fragrance empowered by fresh air and salt water notes.

Don't you just want to scrub up with one of these? 


Updated January 10, 2013
I took a photo of a bar that's been used for a couple of baths to show what the swirl looks inside.  Every time you use it the swirl changes as the swirl changes through out the soap as it was poured!


Saturday, January 28, 2012

Castile VS Bastile ~~ what does that mean?

Castile and bastile are two terms that can mean anything and everything to many different people. I've seen soaps listed/made as castile or bastile but they contained very little olive oil.

Traditionally speaking true castile soap should only contain one oil and that's olive oil. The lather from a castile soap is one that people either love or hate. Castile soap is very gentle and highly moisturizing. The lather is very creamy rather than having big bubbles, but also many describe the lather as slimy.

The term bastile came along because people didn't like the lather of pure castile soap. So they added a few additional oils to boost the lather while keeping the high olive oil content of the soap. A good bastile soap will contain more than 60% olive oil but the more olive oil used the better.

Both terms castile and bastile can also be called a loose term because it can mean something different to different people. It might contain as little as 50% olive oil (or even less) or as much as 80% or more of olive oil. I've seen castile and bastile soaps recipes listed with as little as 25% olive oil.

But both castile and bastile soaps may contain liquids other than water. They may also contain other additives such as silk, clay, or even oatmeal.   Fragrance and color may also be added to either soap to make them more desirable and unique to use. 

Both of these soaps become much better as they age.

Since castile soap uses 100% olive oil I won't go into a recipe for that.   But here are a few bastile soap recipe options.   Remember to always run your recipe through a lye calculator such as soapcalc.   Select the total weight of the oils you plan to use and the calculator will figure out how much of each ingredient you need to weigh out to complete your soap.

Variation #1
Olive Oil 75%
Coconut Oil 12%
Castor Oil 13%

Hardness 22 ~~ Cleansing 8 ~~ Conditioning 75
Bubbly Lather 20 ~~ Creamy Lather 26

Variation #2
Olive Oil 85%
Castor Oil 15%

Hardness 14 ~~ Cleansing 0 ~~ Conditioning 84
Bubbly Lather 14 ~~ Creamy Lather 28

Variation #3
Olive Oil 65%
Coconut Oil 20%
Castor Oil 15%

Hardness 27 ~~ Cleansing 13 ~~ Conditioning 70
Bubbly Lather 27 ~~ Creamy Lather 27

This gives you a few options to start with.   Coconut Oil and Castor Oil are used because they are two of the most popular oils that add to the lather of the soap that is desired.  Coconut oil adds a wonderful lather but if too much is used it can be very drying to the skin.  Unlike castor oil which also makes a nice lather is very moisturizing.

Thursday, September 30, 2010

Another Soap Recipe

http://www.soapcalc.net/calc/SoapCalcWP.asp

 Hardness 43
Cleansing 14
Conditioning 54
Bubbly 23
Creamy 38

Palm Oil 50%
Coconut Oil 20%
Castor Oil 10%
Olive Oil 10%
Safflower Oil 10%

Sunday, July 4, 2010

CP Soap Recipe

Click On Photo To Enlarge It

This soap recipe is for a 1 pound batch, I am giving instructions for both percents as well as weight amounts.  This soap recipe uses Coconut Oil, Palm Oil, Grapeseed Oil,Canola Oil, Castor Oil and Olive Oil


Not all oils are created equal and they each bring their own unique properties into your finished bar of soap.  If you substitute any oils listed here for another you risk getting undesirable qualities in your finished bar of soap.   This soap was designed to provide specific qualities using the oils listed in the amounts given.

You can check out the link about different lye calculator option on the right side under the categories column for "lye calculators"

Sunday, May 30, 2010

Bastile Soap

Bastile Soap and Castile soap are two terms that can very from person to person.   To me Castile soap should only be called Castile when it contains 100% Olive Oil for the oil portion.  Bastile soap to me is a soap that contains at least 50% or more Olive Oil.

1 pound recipe

60% Olive Oil ~ 9.6 oz
13% Castor Oil ~ 2.08 oz
22% Coconut Oil ~ 3.52 oz
05% Canola Oil ~ 0.8 oz

Use a lye calculator to get the amount of liquid an lye to use.

Not all oils are created equal and they each bring their own unique properties into your finished bar of soap.  If you substitute any oils listed here for another you risk getting undesirable qualities in your finished bar of soap.   This soap was designed to provide specific qualities using the oils listed in the amounts given.

You can check out the link about different lye calculator option on the right side under the categories column for "lye calculators"

Local Ingredient CP Recipe

1 pound recipe
re-sizer link given at bottom of page

42% Lard ~ 6.72 oz
25% Coconut Oil ~ 4 oz
11% Castor Oil ~ 1.76 oz
12% Soybean Oil (vegetable oil) ~ 1.92 oz
10% Olive Oil ~ 1.6 oz

Use a lye calculator to get the amount of liquid an lye to use.

Not all oils are created equal and they each bring their own unique properties into your finished bar of soap.  If you substitute any oils listed here for another you risk getting undesirable qualities in your finished bar of soap.   This soap was designed to provide specific qualities using the oils listed in the amounts given.


You can check out the link about different lye calculator option on the right side under the categories column for "lye calculators"

Shea Butter CP Soap


1 lb Batch

05% Shea Butter ~ 0.8 oz
40% Palm Oil ~ 6.4 oz
20% Coconut Oil ~ 3.2 oz
12% Castor Oil ~ 1.92 oz
07% Corn Oil ~ 1.12 oz
07% Canola Oil ~ 1.12 oz
09% Soybean Oil 1.44 oz

Use a lye calculator to get the amount of liquid an lye to use.

Not all oils are created equal and they each bring their own unique properties into your finished bar of soap.  If you substitute any oils listed here for another you risk getting undesirable qualities in your finished bar of soap.   This soap was designed to provide specific qualities using the oils listed in the amounts given.

You can check out the link about different lye calculator option on the right side under the categories column for "lye calculators"